Well this was long overdue but I guess better late then never. This past February we were tasked with creating an AArch64 assembler program that would output a message 30 times, while counting upward. Additionally, we needed to suppress (hide) the leading zero for the single digit numbers. We were also tasked with creating a x86-64 version as well.
In higher level languages, this would be a small task, but in assembler there is a lot more setup required to accomplish this result. Further more, despite AArch64 being an assembly language, there are differences in the wording and implementation of opcodes, as well as extra functionality not present in the venerable 6502 assembly language. This was a bit of an extreme comparison given how old 6502 is, however it does illustrate how no two processors may be alike. In the wake of the x86 line of processors however, there has been a some standardization in the assembler language syntax.
Now why do I bring this up you ask? Well as software developers, we may realize that it would be more lucra… I mean, good for the community if the software were available to everyone on various platforms. This provides a challenge however, as hardware differs from device to device, so one can not just transfer the code over and expect it to run. That said, to make the software run, and run well, it requires knowledge of how to optimize the software to cater to the unique specifications of the hardware. This may require one to change how the program is complied, (built), written, or a combination of the two approaches, so that it can operate as expected. In regards to software, this is what we call “porting,” with the optimization aspect being the challenge of this process.
Future posts will touch on this more, but in regards to the lab, as we were dealing with two different types of architecture. Therefore the porting approach we took, was along the lines of writing two versions of the software, to match the instructions that each processor understood.
As the code for the AArch64 version was completed as a group effort, I will not be posting it as part of my git repository, and instead provide it here. Many thanks to Ryan Kortko for basically being the one to write the code as we members provided input:
.text .globl _start min = 0 max = 30 _start:mov x19, minmov x20, 10loop: udiv x22, x19, x20 msub x23, x20, x22, x19add w22, w22, 48add w23, w23, 48mov x0, 1 /* file descriptor: 1 is stdout */adr x1, msg /* message location (memory address) */mov x2, len /* message length (bytes) */cmp w22, 48b.eq printFirstadr x21, msg+6strb w22,[x21]printFirst: adr x21, msg+7 strb w23,[x21]mov x8, 64 /* write is syscall #64 */svc 0 /* invoke syscall */add x19, x19, 1cmp x19, maxb.ne loopmov x0, 0 /* status -> 0 */mov x8, 93 /* exit is syscall #93 */svc 0 /* invoke syscall */.data msg: .ascii "Loop: \n" len= . - msg
Ok so how does this work? Well to begin, I want you to look at the second last line of code where you see:
“Loop: \n”
This is what we will be printing 30 times, however it will display as:
Loop: 0
Loop: 1
.
.
.
Loop:29
Now in our code all we have is “Loop: ” with a new line delimiter at the end. How exactly do we get the number to show up? Well our approach was that we would inject the numbers in the empty spaces after the colon (character positions 6 and 7 to be precise), before outputting the message to the screen. We do this by storing those positions in memory locations x21, and check for whether the next set of numbers to be printed represents a multiple of 10 or not. If it does, print the multiple of 10 in position 6, and then the single digit number in position 7; otherwise print only the single digit number in position 7.
On paper this process sounds straight forward, however assembler does not have typical true or false statements like in the higher languages, so we must exploit some math operations to get the same effect. In this case we can use aspects of division with the opcodes “udiv” and “msub” to get the quotient, and remainder value. You can read more about the opcodes mentioned in this post, here.
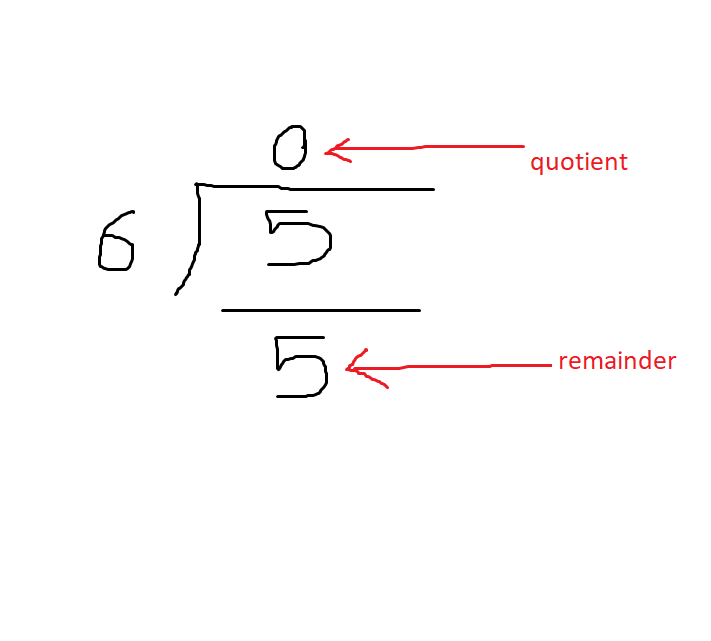
As the image above illustrates, the 0 above the 5, is the quotient, and the remainder is what’s left when you subtract 6 from 5, in the division operation. In this case it will be 5, as 6 is too large a number to subtract from it. I should also stress that the reason we do not care about long division, is because a processor can not traditionally store a decimal value in binary. That out of the way, this is more than enough to conduct a test to see when the quotient is 0 or not. Take note of the fact that the smaller number (inside number) is being divided by the larger number (outside number). With this setup, any number lower than the outside number, will always result in a quotient that is less than 1, and understood as 0. However once the inside number equals or exceed the outside number, the quotient will stop being 0. Now imagine if the 6 here was a 10, and the 5 was actually a value that started at 1, but would eventually increase and keep being divided by 10. Doing so would result in something similar to this:
0.1,0.2,0.3 …. 0.8,0.9 … and … 1, 1.1, 1.2 …. 2,2.1,2.2
(The numbers in bold are what the processor cares about for this type of division.)
I’m sure you’ve noticed that once the value equals or exceeds 10, the quotient stops begin 0. With this method in place, we can now represent multiples of 10 effectively.
If you recall in the previous lab, I talked about decimal mode, as well as briefly touching on how data is stored in the high byte and low byte. Well in this lab, we can use the high byte value to do some truth testing, to help with formatting the number output. In this case we use “udiv” to get the quotient, which is stored in a high byte, and conversely we use “msub,” to get the remainder, which is stored in the low byte.
In the first loop called “loop:” we store the remainder value in a 32 bit memory address, w23, and the quotient in w22 (32 bit denoted by the w, where as x represents 64 bit). The reason for this is to discard the value’s first half of the 32 bits, as it’s too big to fit in the bit lengh of a character. After that, this is where we do the comparison I mentioned earlier. First we check if the value in w22, equals the character 0. This requires the compare “cmp,” and branch if equal “b.eq,” opcodes. If it does, ignore/skip printing anything in position 6, and first print a value in position 7. We use the opcode “strb” to further discard the excess half of the bits depending on if it is the high byte or low byte. In this way, we can output the characters we need to, and also suppress the bits for the high byte when needed. Without doing so, we would end up displaying the quotient’s 0 values, when outputting the single digit numbers 1-9:
01, 02, 03 … 10,
However the desired output is:
1,2,3 … 10.
I admit this was not a deep dive into the program, as I was not the one who directly wrote it. Also, to not leave it unsaid, I have not even touch on the x86 version, but seeing as how this has become quite a long post, I think I will stop here. The next blog post I will begin talking about my class project topic, specifically what software I will be trying to optimize (video encoding). This should also continue the discussion on porting if only briefly.
Well till the next post!
